
How do you make a pottery plate?
To make a pottery plate, choose between wheel-throwing or slab-building. For wheel-thrown plates, center 1.5 to 2 pounds of clay, open it outward into a wide disc, compress the base with a rib, shape a gentle rim, and dry slowly over 3 to 5 days. For slab plates, roll clay to 6mm thickness and drape over a hump or slump mold.
Why Plates Are the Hardest Beginner Form
Most potters avoid making plates for months after they start. There’s a good reason for that. Plates have a wide, flat base and a low profile, which means they fight you at every stage: harder to throw, harder to dry without warping, harder to trim cleanly, and harder to fire without cracking. Mugs and bowls forgive sloppy technique. Plates do not.
The wide horizontal surface creates differential shrinkage as the rim dries faster than the thick base, curling the rim upward like a potato chip. The flat profile means uneven compression in the base shows up later as S-cracks. And the low foot ring needs to be trimmed precisely or the plate wobbles on the table.
This guide covers both wheel-thrown and slab-built methods in full detail, with the exact fixes for every common failure. By the end, you’ll know which method suits your setup, how to avoid warping, and how to troubleshoot the problems that frustrate most beginners.
Section 1: Wheel-Thrown vs. Slab-Built Plates
Before you start, decide which method matches your equipment, skill level, and the kind of plates you want to make.
| Factor | Wheel-Thrown | Slab-Built |
|---|---|---|
| Skill required | Intermediate (centering and pulling required) | Beginner-friendly (no wheel skills needed) |
| Time investment | 10 to 15 minutes per plate at the wheel | 20 to 30 minutes per plate, plus mold prep |
| Equipment needed | Pottery wheel, bats, ribs, wire tool | Rolling pin or slab roller, mold, canvas |
| Surface texture options | Smooth, with throwing rings | Excellent for stamps, lace, leaf impressions |
| Consistency for matched sets | Variable until you’re experienced | Highly consistent using the same mold |
| Best for beginners | No, start with mugs first | Yes, very forgiving method |
If you have a wheel and a few months of practice, throwing plates gives you the most creative freedom and a smoother surface. If you’re new to clay or want six matching plates for a dinner set, slab-building with a mold is the faster, more reliable path. We suggest beginners start with slab plates to build confidence before tackling the wheel.
Section 2: What You Need
Clay
For an 8-inch plate, you need 1.5 to 2 pounds of clay. For a 10-inch dinner plate, plan on 2 to 2.5 pounds. Clay selection matters more for plates than almost any other form, because the wide base amplifies any weakness in the clay body.
Use a smooth, plastic stoneware like B-Mix or a similar mid-range body. Avoid coarse, heavily grogged clay for wheel-thrown plates, as the grog catches under your rib during base compression. For slab plates, a slightly more grogged body works well because it holds its shape better when draped over a mold.
For a full breakdown of which clay bodies suit which projects, see our guide to choosing the right clay for beginners. For the technical side of how clay composition affects plate durability and warping resistance, Ceramic Arts Network has an excellent overview of clay body composition for plates.
Tools
For wheel throwing: a pottery wheel, a bat (porous wood or plaster preferred), a wire tool, two or three ribs (a flat metal rib and a flexible rubber rib), a sponge, and a needle tool. Calipers help if you want matched plates.
For slab building: a rolling pin or slab roller, canvas cloth to roll on, two thickness guide rods (1/4 inch dowels work fine), a hump mold or slump mold (a shallow bowl works), a fettling knife, and a flexible rib for smoothing.
Section 3: Method 1, Wheel-Thrown Plates
If this is your first time at the wheel, start with our complete guide to throwing pottery before tackling plates. Plates demand solid fundamentals because the low, wide form is unforgiving.
Step 1: Center Your Clay
Slap your clay ball firmly onto the bat, centered as best you can by eye. Wet your hands lightly, brace your elbows against your body, and bring the clay to true center using steady pressure. Plates start from a flatter centered hump than mugs do, but the centering itself must be perfect. Any wobble at this stage becomes a warped rim later. For the technique in depth, see our guide on how to center your clay thoroughly before moving to the next step.
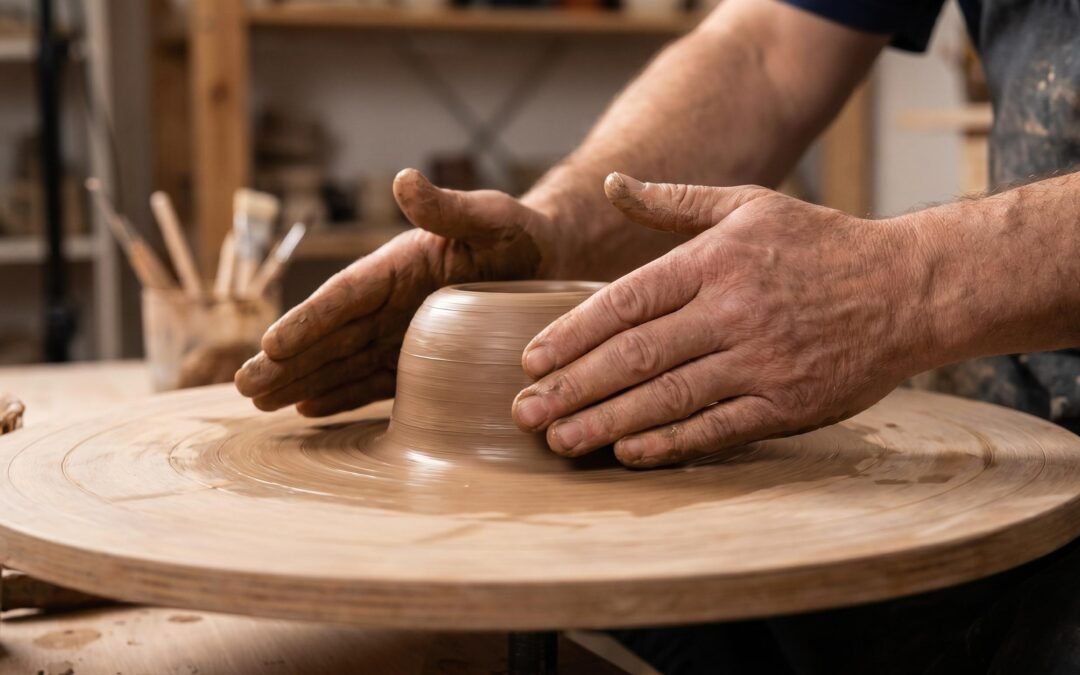
Step 2: Open Outward, Not Upward
This is the single biggest technical difference between throwing a plate and throwing a mug. Press down into the centered clay with your thumbs or fingertips, then move your hands outward to the sides rather than pulling clay upward. Open the clay wide, at least two-thirds of your final plate diameter, before you do anything else. A plate lives in the horizontal plane. Treat it like one.
Step 3: Compress the Base
Take a flat metal rib and press it firmly across the entire base of your opened clay, from the center outward, while the wheel turns slowly. Do this two or three times. Base compression seals the clay particles and forces them to align, which prevents the dreaded S-crack later. Skip this step and your plate will crack in the kiln. Every time.
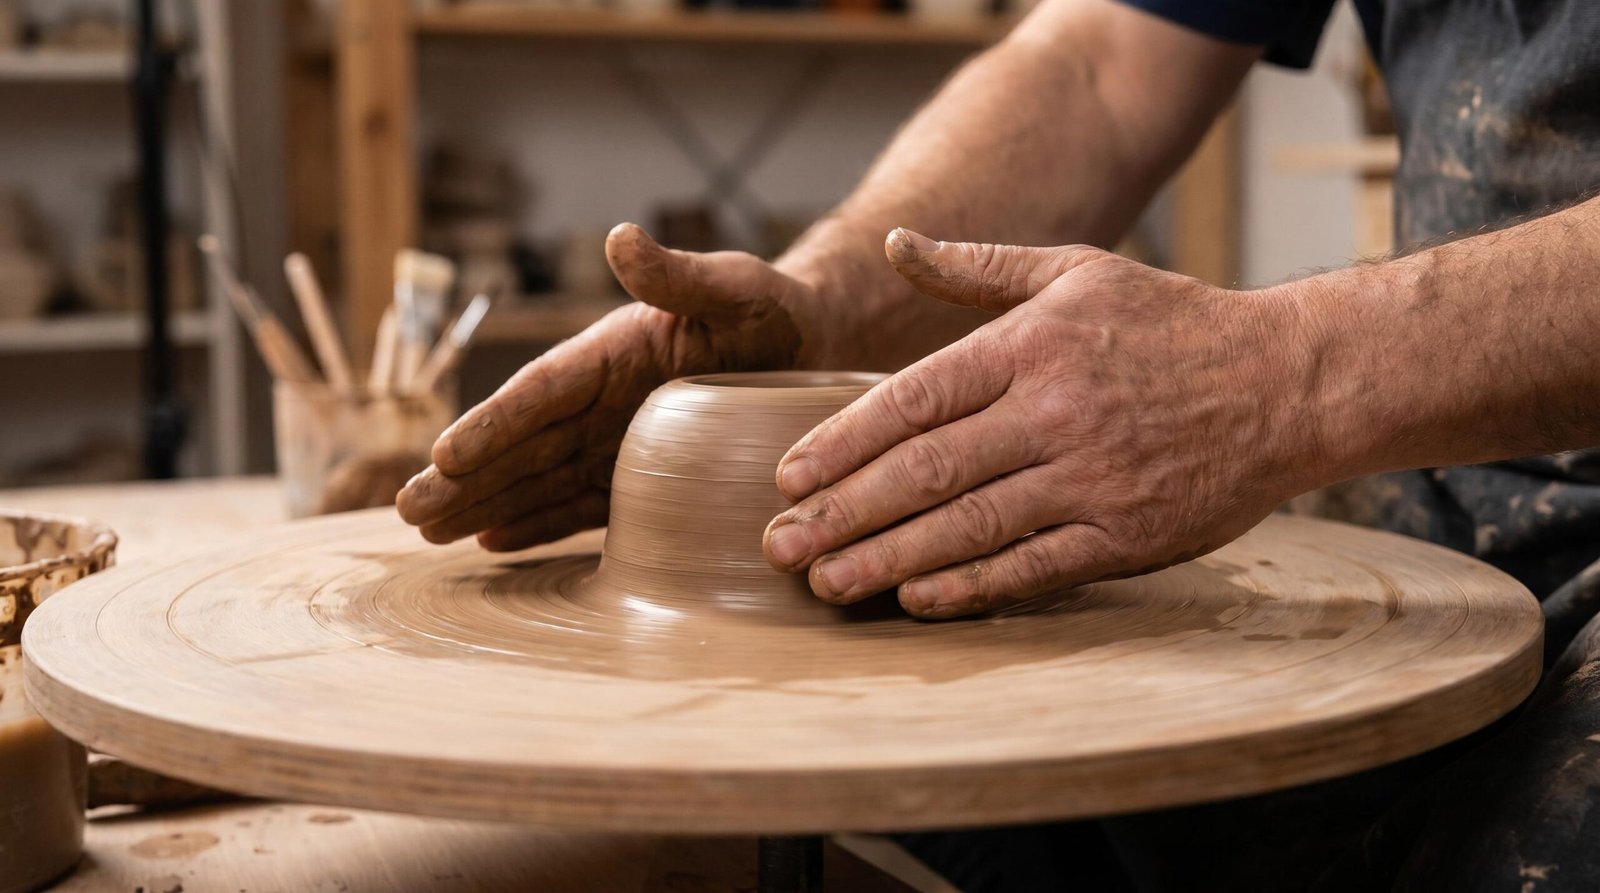
Step 4: Pull the Walls to Correct Thickness
Plate walls should be 6 to 7mm thick, slightly thicker than a mug. The extra thickness gives the plate structural integrity as it dries and resists warping. Pull the walls in two or three short, controlled pulls. Don’t try to make them tall. A plate’s wall might only be 2 to 3 cm high.
Step 5: Shape the Rim
Push the rim outward and slightly upward from below using your inside hand. Create a gentle lip that flares out, not a vertical wall. The rim should curve up just enough to contain food without making the plate look like a shallow bowl. Don’t go too vertical. A near-flat plate with a soft rim curl is the classic dinner plate profile.
Step 6: Define the Foot Ring Area
Before you finish at the wheel, use a needle tool or thin rib to score a faint ring around the underside of the plate, marking where the foot ring will be when you trim later. Leave a thick band of clay at the outer base, about 1cm wide, which gives you material to trim a proper foot ring into.
Step 7: Leave on the Bat
Do not wire the plate off the bat. Even if it looks ready, do not. Plates removed from the bat while wet warp almost immediately because the soft base can’t support the rim. Leave the plate on the bat until it reaches leather-hard, which takes 12 to 24 hours depending on humidity. Loosely cover it with plastic to slow the drying of the rim.
Step 8: Trim the Foot Ring
Once the plate is leather-hard (firm but still cool to the touch), flip it upside down on the wheel, recenter it, and trim a low, wide foot ring with a loop tool. The foot ring should be wide for stability and shallow (only 4 to 5mm deep). A narrow foot ring on a plate is asking for warping problems. For the full trimming technique, see our guide on how to trim pottery for foot ring details.
Step 9: Final Drying
This is where most beginner plates fail. After trimming, cover the plate loosely with plastic (a plastic tent, not a tight wrap) and let it dry slowly over 3 to 5 days. Flip the plate gently every 12 to 24 hours so both sides dry at the same rate. Skip this and you’ll watch your rim curl upward overnight.
Section 4: Method 2, Slab-Built Plates
Slab plates are forgiving, repeatable, and require no wheel skills. They’re also fantastic for surface decoration, since you can press texture into the flat slab before draping it over a mold. For more on this approach, Ceramic Arts Network offers a deep technical breakdown of slab and wheel-made plate techniques.
Step 1: Roll Your Slab
Place your clay between two 1/4 inch (6mm) guide rods on a piece of canvas. Roll outward from the center with a rolling pin, rotating the slab a quarter-turn between passes to keep it even. The guide rods ensure consistent thickness. If you have a slab roller, run the clay through set to 6mm.
Step 2: Firm the Slab
Don’t drape a wet, floppy slab over a mold or it will sag and tear. Let the slab firm up to a soft leather-hard state first, which takes 30 to 60 minutes uncovered depending on humidity. The slab should hold its shape when lifted but still bend without cracking.
Step 3: Hump Mold vs. Slump Mold
The two molding methods produce different results. Pick based on which surface (inside or outside) you want to be smooth.
| Mold Type | How It Works | Best For |
|---|---|---|
| Hump mold | Clay draped over the top of a convex form (like an upside-down bowl). The outside of the plate is smooth. | Smooth-bottom plates where the underside is the visible side, or for plates you’ll texture on the inside |
| Slump mold | Clay pressed into a concave form (like the inside of a bowl). The inside of the plate is smooth. | Plates with textured outsides (leaf impressions, stamps) where the food surface needs to be smooth |
Step 4: Drape and Smooth
Lift your firmed slab carefully (use the canvas to support it) and drape it over the hump mold or press it gently into the slump mold. Smooth the clay against the mold with your palms and a flexible rib, working out any air pockets. Don’t press hard enough to thin the clay.
Step 5: Texture Options
For decorative plates, press texture into the slab before draping. Lace doilies, dried leaves, rubber stamps, and carved wooden blocks all work. The texture goes on whichever side will face up after firing (the eating surface for a slump mold plate, the back for a hump mold plate).
Step 6: Trim the Edge
Let the plate firm up on the mold until it reaches leather-hard, then trim the rim with a fettling knife or needle tool. Cut a clean, even edge. Soften the cut edge with a damp sponge for a smoother lip.
Step 7: Add a Foot (Optional)
If you want a raised foot ring on the underside of a slump-molded plate, roll a thin coil of clay, score and slip it onto the base in a circle, and smooth it into place. Hump-molded plates often don’t need a foot ring at all, as the mold creates a natural curve that lifts the plate slightly off the table.
Step 8: Dry Slowly
Once the plate releases from the mold (usually after another 12 to 24 hours), set it on a porous bat and cover loosely with plastic. The same slow drying rules from wheel-thrown plates apply: 3 to 5 days, flip every 12 to 24 hours.
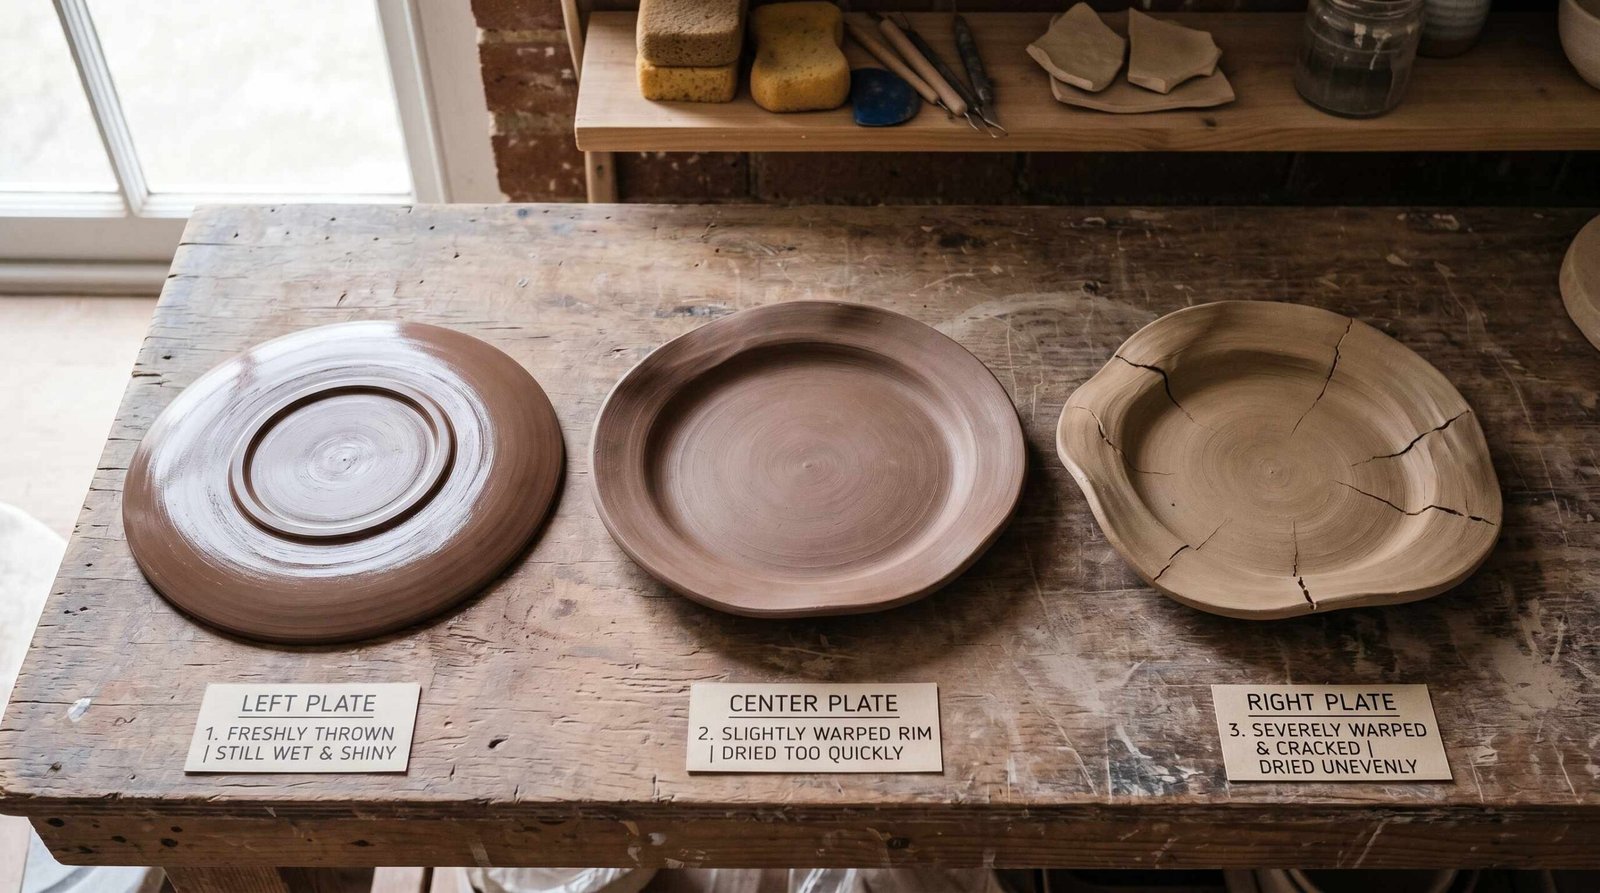
Section 5: The Drying Problem, Why Plates Warp
This section covers what almost no other plate guide explains properly. If you understand warping, you can prevent it.
Plates warp because the rim dries faster than the base. The rim is thin and exposed to air on both surfaces; the base is thick and sits flat on a bat. As the rim loses moisture and shrinks, the still-wet base resists shrinking. The result is a curled rim, almost always pulling upward. By the time you notice, the warp is permanent.
The Fix
Cover the plate loosely with a plastic tent (a sheet of dry cleaner plastic over the plate works well). Do not wrap it tightly, as you want some moisture to escape, just slowly. Flip the plate gently every 12 to 24 hours so the surface that was sitting against the bat gets exposed to air, evening out the moisture loss between the two sides. Total drying time should be 3 to 5 days, not the 1 to 2 days you might use for a mug.
Extra Tip: Use a Porous Bat
Plates dry better on a porous wooden or plaster bat than on a smooth metal or plastic bat. The porous surface lets the underside of the plate breathe, preventing the trapped moisture that causes the base to stay wet while the rim dries. If you only have plastic bats, lift the plate onto a wooden board or drywall plank for the slow-drying phase.
| Form | Drying Time | Method | Flipping Required |
|---|---|---|---|
| Plates | 3 to 5 days | Slow, loose plastic tent | Yes, every 12 to 24 hours |
| Mugs and bowls | 1 to 2 days | Faster, light cover | Not required |
Section 6: Firing Your Pottery Plates
Plates fire the same as any other pottery: a bisque firing first to harden the clay, then a glaze firing to seal and finish the surface. For the full firing sequence, see our bisque firing guide.
One plate-specific note that catches many beginners: always wax the foot ring before dip-glazing. Apply liquid wax resist to the entire foot ring and the bottom 2mm of the plate’s underside. The wax prevents glaze from sticking to the foot, which would otherwise fuse your plate to the kiln shelf at glaze temperature. Without waxing, you’ll lose plates to shelf-sticking accidents.
Plates also benefit from a slower firing ramp than mugs because of their flat, wide form. Ramp slowly to 120°C (250°F) and hold for an hour to drive off any remaining moisture before climbing higher. For the technical detail on how firing affects plate durability, Digital Fire has an excellent overview of firing temperatures and plate durability.
Section 7: Troubleshooting Pottery Plate Problems
Almost every plate failure has a clear cause and a clear fix. Use this table when something goes wrong.
| Problem | Cause | Fix |
|---|---|---|
| Rim warping upward | Rim dried faster than base | Slow dry, cover with plastic, flip daily |
| Cracks in base | Uneven compression or too-fast drying | Compress base thoroughly with a rib; dry slower |
| Rim wobble (uneven thickness) | Uneven opening at the wheel stage | Use calipers, take more time opening evenly |
| Plate sticking to bat | Removed too early | Wait until leather-hard before wiring off |
| Foot ring crumbling | Trimmed too dry or too thin | Trim at leather-hard, leave 5 to 6mm thickness |
| Glaze crawling on surface | Glaze applied too thick, or dusty bisque | Wipe bisque surface before glazing, thin coats |
| S-crack in base | Clay not compressed at center during centering | Compress the center 2 to 3 times after opening |
| Plate cracking through rim in kiln | Too-rapid firing schedule | Ramp slowly to 120°C (250°F) and hold |
Section 8: Frequently Asked Questions
How much clay do I need to make a pottery plate?
For an 8-inch plate, use 1.5 to 2 pounds of clay. For a 10-inch dinner plate, use 2 to 2.5 pounds. Smaller side plates (6 inches) need around 1 pound. Always weigh your clay before starting if you want a matched set, because eyeballing leads to inconsistent diameters and thicknesses across pieces.
Why do pottery plates warp?
Pottery plates warp because the thin rim dries faster than the thick base, creating differential shrinkage that pulls the rim upward. To prevent warping, cover the plate loosely with plastic, flip it gently every 12 to 24 hours during drying, and let the whole drying process take 3 to 5 days rather than rushing it.
Can beginners make pottery plates?
Yes, but we suggest beginners start with slab-built plates rather than wheel-thrown plates. Slab plates need no wheel skills, produce consistent results, and let you focus on learning clay handling and drying technique. Wheel-thrown plates are notoriously hard and require solid centering and pulling skills, which most beginners take a few months to develop.
How thick should pottery plate walls be?
Pottery plate walls should be 6 to 7mm thick, slightly thicker than mug walls. The extra thickness gives the plate structural integrity during drying and reduces warping. The base should be a similar thickness, around 6 to 8mm after trimming, with a foot ring that adds another 4 to 5mm of clay around the underside edge.
How long does it take for a pottery plate to dry?
A pottery plate should dry slowly over 3 to 5 days, much longer than the 1 to 2 days needed for mugs and bowls. The slow drying schedule prevents the rim from drying faster than the base, which causes warping. Cover the plate loosely with plastic during drying and flip it every 12 to 24 hours.
What clay is best for making plates?
A smooth, plastic stoneware like B-Mix works best for wheel-thrown plates because it handles the wide base compression well and resists warping. For slab plates, a slightly more grogged stoneware holds its shape better when draped over a mold. Avoid heavily grogged or porcelain clay for your first plates, as both bring extra challenges.