
Underglaze Pottery: A Complete Guide to Techniques, Applications, and Getting Started
If you have ever wondered how potters paint those crisp floral patterns and fine lettering on mugs without the colors smearing in the kiln, the answer is almost always underglaze. This guide walks through what underglaze is, the six core application techniques, when to apply it, how it performs at different cone ranges, food safety, brand comparisons, and the eight mistakes new potters make most often.
What Is Underglaze? The Basics Explained
Underglaze is a pigmented decorating material made from colorant oxides, refractory clays, and a small amount of flux. Think of it as a thick, opaque watercolor designed specifically for raw or bisque-fired clay. You paint it on, let it dry, fire it, then cover it with a clear glaze for a glossy protective finish.
The defining characteristic of underglaze is its stability. Where a regular glaze is essentially powdered glass that melts and flows during firing, underglaze contains far less flux, so it stays exactly where you brushed it. Sharp edges remain sharp. Fine lines remain fine. A signature on the bottom of your bowl will still be legible after a cone 6 firing.
Underglaze has a long lineage. It was historically used in Chinese blue-and-white porcelain dating back to the Tang Dynasty, where cobalt oxide was painted onto unfired porcelain and covered with a clear glaze. The technique was refined during the Yuan and Ming dynasties, producing the iconic blue-and-white wares that influenced traditions from Persian Iznik ware to Dutch Delftware.
| Underglaze | Glaze | Glaze Stain | |
|---|---|---|---|
| When applied | On greenware or bisque, before clear glaze | On bisque, as a final coat | Mixed into a base glaze before application |
| Color stability after firing | High – colors stay where you paint them | Variable – can move and pool during firing | Stable within the glaze matrix |
| Line sharpness | Sharp, precise edges | Soft, often blurred edges | Diffuse, blends with glaze |
| Typical use | Detailed painted designs, lettering, illustration | Surface finish, sheen, texture, color washes | Tinting a clear or base glaze a specific color |
| Food safety | Food safe when sealed with food-safe clear glaze | Food safe if formulated for it (lead-free, stable) | Food safe if the base glaze is food safe |
If you are new to glazing in general, we suggest pairing this article with our complete guide to pottery glazing so you understand how the clear top coat interacts with the underglaze below it.
How Underglaze Works
The chemistry of underglaze sounds intimidating, but the practical idea is simple. Underglaze contains three main ingredients: refractory clay (usually kaolin or ball clay) that provides body and adhesion, colorant oxides that produce the actual color, and a small fraction of flux to help the pigment fuse to the clay during firing.
The key word is “small.” A typical glaze recipe might be 30 to 50 percent flux. An underglaze is closer to 5 to 10 percent. Less flux means less melting, which means the pigment does not flow sideways during firing. That is why your hand-painted lines stay crisp.
The colors themselves come from metal oxides and stains. Cobalt oxide produces classic blues. Iron oxide gives warm reds and browns. Chrome oxide produces greens. Manganese gives purples and dark browns. Modern commercial underglazes also use synthetic ceramic stains – pre-fired colored frits ground into a stable pigment – which gives you a much wider palette than raw oxides alone.
Some colors hold up across the entire temperature range. Cobalt blue at cone 10 looks essentially the same as cobalt blue at cone 06. Iron oxides also stay reasonably stable. The colors that give potters trouble are reds, oranges, bright yellows, and pinks. These often come from cadmium-selenium or chromium-tin stains that begin to burn out as temperatures climb past cone 6. A vibrant orange at cone 06 can fade to a dull tan at cone 10. Every underglaze you buy will have a recommended cone range on the label, and you should respect it.
6 Ways to Apply Underglaze
Underglaze accepts more techniques than almost any other ceramic decorating material. Here are the six methods you will use most often, from standard brushwork to specialty techniques that produce instantly recognizable effects.
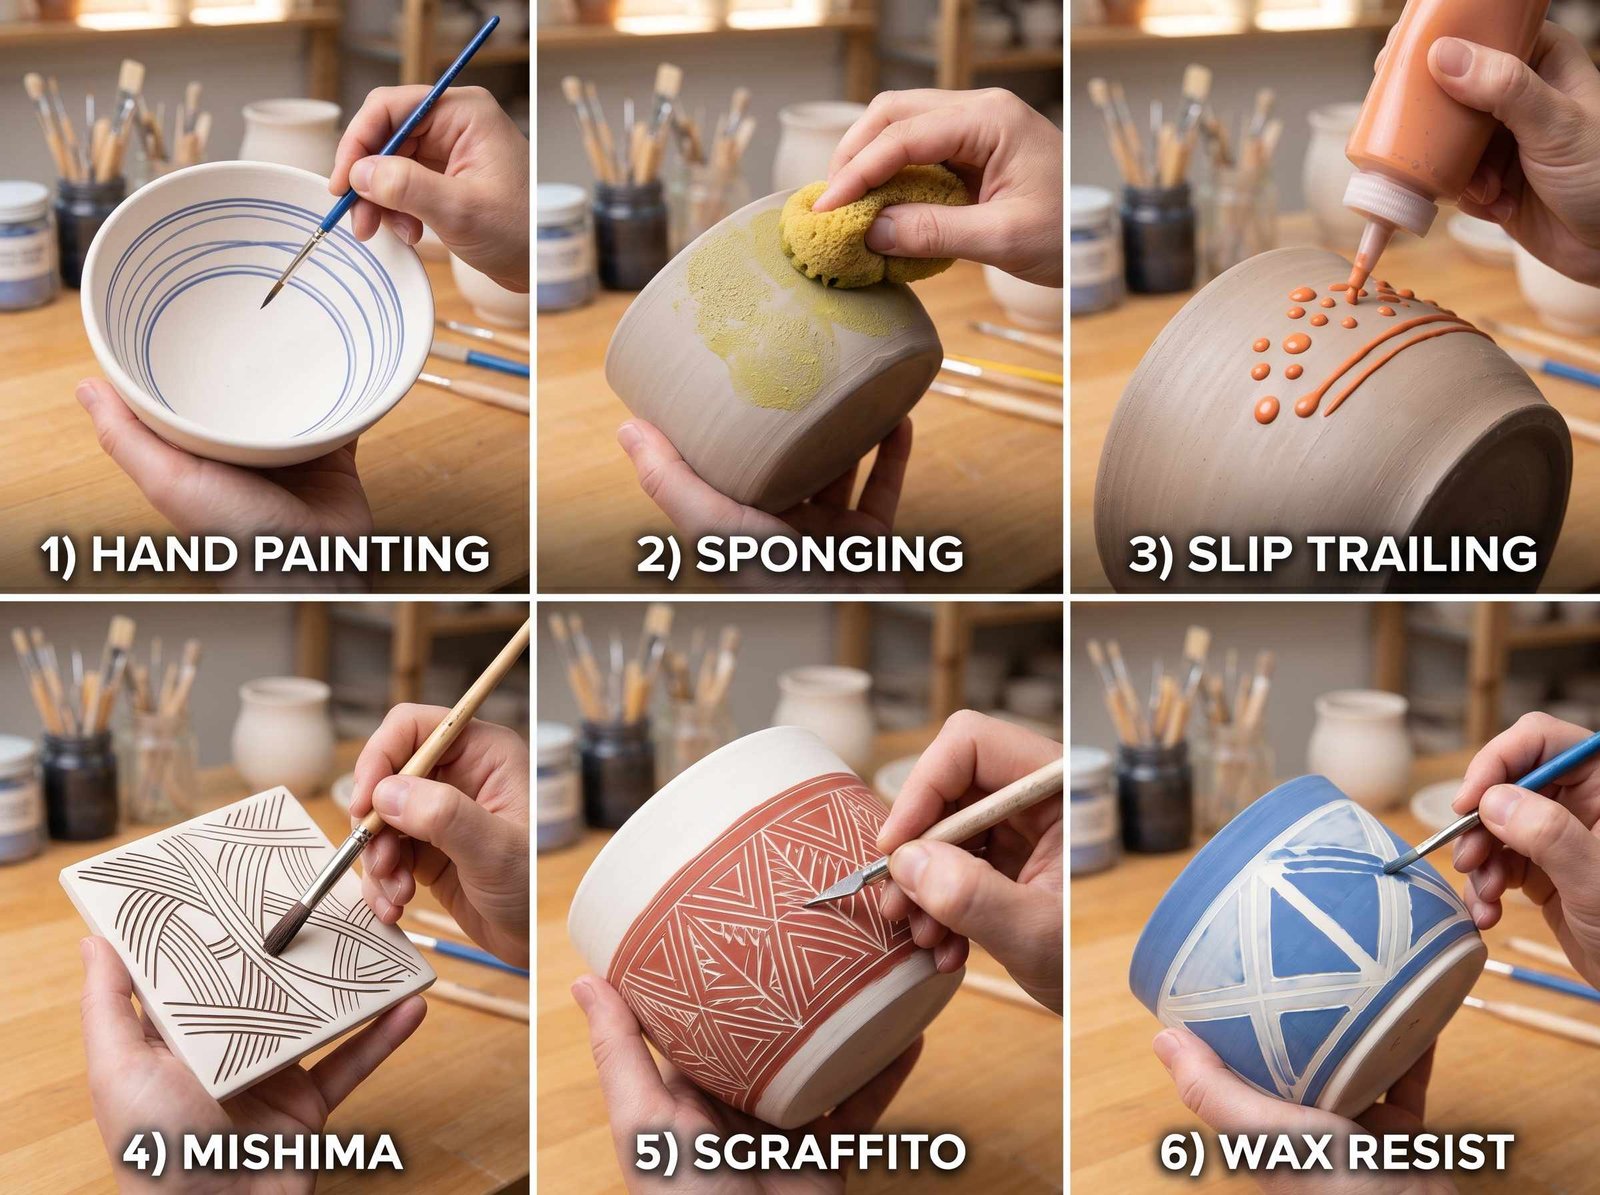
1. Brushing (the standard method)
Brushing is the default approach and the one to master first. The rule that matters most: three thin coats, each applied at a right angle to the previous one (horizontal, then vertical, then horizontal). Brush strokes cancel out and you end up with flat, even color.
One coat looks streaky. Two coats looks translucent. Three coats gives the opaque, even surface you see in finished commercial pottery. Let each coat dry until it loses its sheen before applying the next – usually two to five minutes depending on humidity.
For brush selection, soft round brushes in size 4 to 8 handle most flat work. A pointed liner brush handles fine detail and outlines. For broad washes, a soft hake brush or wide flat works best. Avoid stiff bristle brushes – they leave streaks.
2. Sponging
Sponging produces soft, organic textures that brushwork cannot match – gradients, stone or moss effects, atmospheric depth. The technique is forgiving and almost impossible to get wrong.
The sponge matters more than the technique. Natural sea sponges produce irregular, lacy patterns with interesting voids – perfect for botanical and abstract effects. Synthetic cellulose sponges give a more uniform stippled texture for graduated backgrounds. Dab the sponge in the underglaze, blot the excess, then press gently onto your pot.
3. Slip Trailing
Slip trailing creates raised lines and dots by squeezing underglaze through a fine nozzle, similar to decorating a cake. The effect is tactile and dimensional – polish-dot patterns, scrollwork, and pointillist designs all become possible.
Consistency is the make-or-break variable. Your underglaze needs to be thicker than brushing consistency – about heavy cream. Too thin and it spreads and loses its raised quality. Too thick and it clogs the nozzle. Many potters mix a little extra ball clay or CMC gum into the bottle to dial in the right viscosity.
4. Mishima
Mishima is a Korean inlay technique producing clean line work flush with the surface. The process: carve thin lines into leather-hard clay with a needle tool, brush underglaze over the carved lines, then wipe back the surface with a damp sponge until only the underglaze filling the carved channels remains. The result is a tattoo-like line drawing inlaid into the clay surface.
Clay choice matters because softer clays carve cleanly while gritty clays tear and chip. Our guide to choosing pottery clay covers which clay bodies hold a carved line and which crumble at the leather-hard stage.
5. Sgraffito
Sgraffito flips the mishima logic. Instead of carving first and filling with color, you apply underglaze first and scratch designs through it to reveal the bare clay beneath. The contrast between painted color and natural clay creates a strong graphic look ideal for line drawings, lettering, and folk patterns.
Timing is everything. The best stage to scratch is when the underglaze is fully dry but the clay is still leather-hard. Bone dry clay produces dust that contaminates the design. Tacky underglaze drags and smears under the tool. The sweet spot is usually 20 to 60 minutes after application.
6. Wax Resist
Wax resist is the technique for clean separation between colors. Apply your first underglaze, let it dry, paint wax resist over the areas you want to protect, then apply a second underglaze on top. The wax repels the second color, so during firing the wax burns off and you are left with two crisp color zones meeting at a perfect edge.
This is how potters get graphic stripes, masked text, and color blocking impossible to paint freehand. Liquid wax emulsions work better than melted wax because they brush on like paint. You will need a dedicated brush for wax – it will never paint cleanly again afterward. Our roundup of pottery brushes and application tools covers which brush shapes work best for waxing versus underglaze.
Greenware, Leather-Hard, or Bisque: When to Apply Underglaze
Underglaze can go on at three different stages of the pottery process, and each stage has tradeoffs. Knowing which to choose for your project saves a lot of frustration.
| Stage | Pros | Cons |
|---|---|---|
| Wet/soft greenware | Great for slip-style application; integrates with the clay; allows carving | Risk of warping from moisture; smudges easily; piece is fragile |
| Leather-hard greenware | Best for mishima, sgraffito, and carved techniques; clay holds carving cleanly | Surface still vulnerable to damage; needs careful handling; some color shift |
| Bisque | Most beginner-friendly; absorbent surface accepts color evenly; piece is sturdy | Cannot carve into the clay; mishima and sgraffito are off the table |
For most beginners, we suggest applying to bisqueware. Bisque is sturdy enough to handle without breaking, the porous surface absorbs underglaze evenly, and you can work over multiple sessions without the piece drying unevenly. Our breakdown of the bisque firing process explains where it fits in the standard two-firing workflow.
Once you are comfortable, leather-hard application opens up sculptural techniques like mishima and sgraffito. Many experienced potters use both: leather-hard for inlaid line work, then bisque for painted fills.
Firing Temperature and Cone Ranges
Most commercial underglazes are formulated to work across a wide cone range, typically cone 06 (low fire, around 1828 F) up through cone 10 (high fire, around 2381 F). But “works at” and “looks the same at” are two very different things. Color performance shifts with temperature, and the shifts are not subtle.
Here is what you can expect from common colors as temperature increases:
| Color | Cone 06 (Low Fire) | Cone 6 (Mid Fire) | Cone 10 (High Fire) |
|---|---|---|---|
| Cobalt Blue | Bright, slightly chalky | Deep, true blue | Rich, slightly darker blue – very stable |
| Iron Oxide Brown | Light tan to medium brown | Warm chocolate brown | Dark brown to near-black; can bleed slightly |
| Red | Vivid, true red | Muted brick or rust | Often burns to brown or tan |
| Green (chrome-based) | Bright spring green | Deep forest green | Stable dark green; can shift cooler |
| Yellow | Bright lemon to gold | Slightly muted, more honey-toned | Often fades; some yellows burn out entirely |
If you fire at cone 6 (the most common mid-range for hobby studios) you will get reliable results from most of the palette. At cone 10 reduction, avoid warm bright colors or accept that they will become muted earth tones. Cone 06 (low-fire majolica and earthenware) gives the brightest, truest colors but the most fragile final ceramic.
Test tiles are not optional. Before committing a color to a real piece, fire a small slab of the same clay with the same underglaze at your target cone. Keep a firing log with photos. Your kiln, your clay, and your firing schedule all affect the outcome, and what works in someone else’s studio may not work in yours.
If you are still sorting out which kiln and temperature setup is right for your studio, our overview of kiln temperature ranges walks through the cone system in more depth.
Is Underglaze Food Safe?
The short answer: the food safety of underglazed pottery depends almost entirely on the clear glaze you put over the top, not the underglaze itself. The underglaze is sealed by the clear glaze during firing, becoming part of the vitrified surface. If your clear glaze is food safe, lead-free, and fired to maturity, the piece is food safe.
All major commercial underglaze lines (Amaco, Speedball, Mayco, Duncan, Spectrum) are lead-free and non-toxic when fired. They are designed for functional ware and rated food safe when sealed with an appropriate clear glaze.
One serious safety note: dry underglaze powder contains crystalline silica. Breathing silica dust over time causes silicosis, a permanent progressive lung disease. If you mix your own underglazes from raw materials, weigh dry colorants, or sand fired pieces, always wear an N95 respirator and work in a well-ventilated area. The OSHA’s crystalline silica standards provide exposure limits that apply equally to home studios.
Once underglaze is wet, the silica risk drops dramatically because the powder is bound in liquid. Commercial bottled underglazes are safe to handle without a mask under normal conditions. The danger window is dry powder, dry sanding, and dry sweeping.
If you formulate your own underglazes from raw oxides, be aware that some colorants (particularly chromium, cadmium-selenium reds, and barium) raise food-contact concerns even when sealed. For functional ware, we suggest sticking with commercial food-safe rated underglazes from established brands rather than experimental homemade recipes.
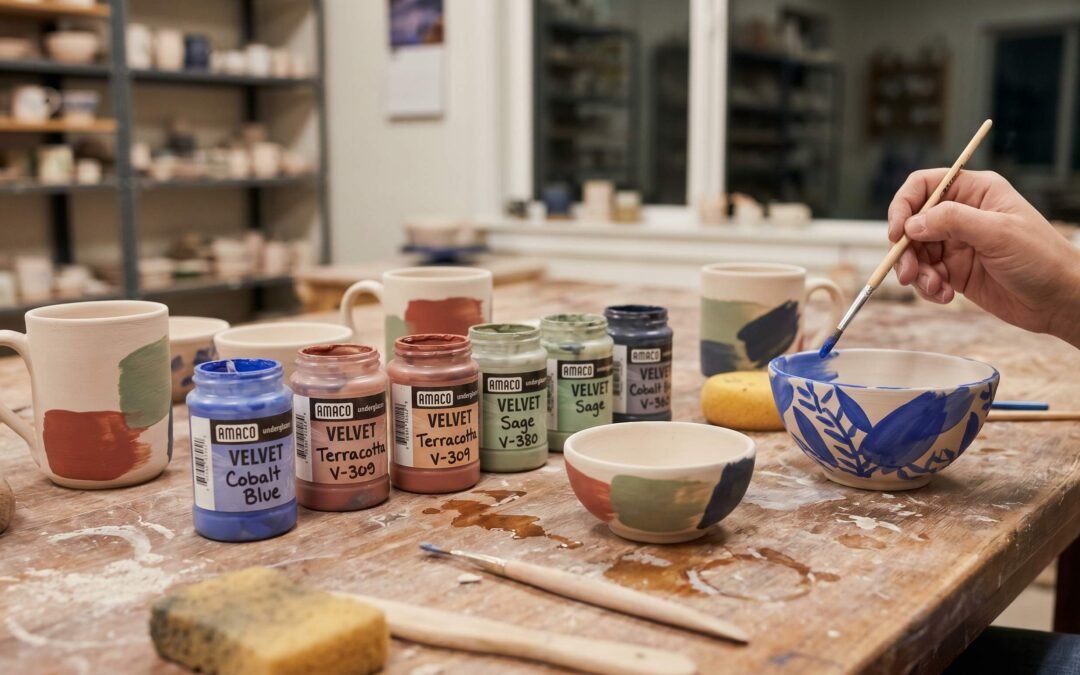
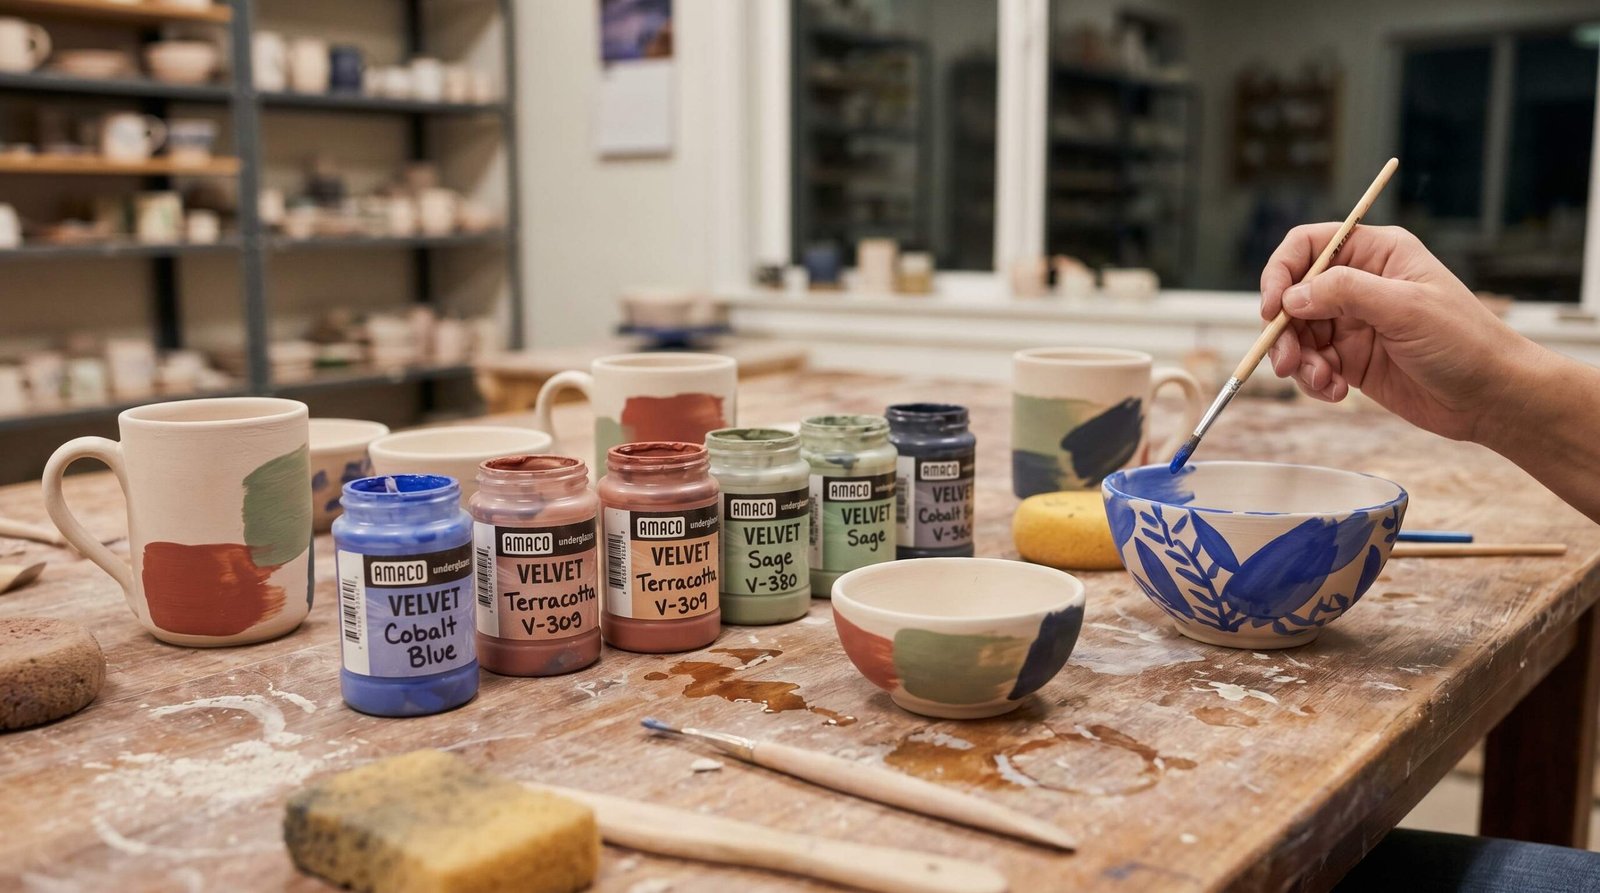
Top 5 Underglaze Brands Compared
Walk into any ceramics supplier and you will find dozens of underglaze brands. Five of them dominate North American studio practice, and they are not all interchangeable. Here is how they stack up.
| Brand | Cone Range | Consistency | Colors Available | Price (2oz) | Best For |
|---|---|---|---|---|---|
| Amaco Velvet | Cone 05 to Cone 10 | Smooth, creamy, opaque | 67 colors | $5 to $7 | Studio potters who want reliable, true colors at any cone |
| Speedball Underglaze | Cone 05 to Cone 6 | Smooth, slightly thinner | 24 colors | $4 to $6 | Schools, beginners, low-to-mid fire decorating |
| Mayco Stroke & Coat | Cone 06 to Cone 10 | Self-leveling, glaze-like | 85 colors | $6 to $8 | One-coat coverage; doubles as a low-fire glaze |
| Duncan Concepts | Cone 06 to Cone 6 | Creamy, intermixable | 78 colors | $5 to $7 | Bright colors, painterly application, easy mixing |
| Spectrum 500 | Cone 04 to Cone 10 | Smooth, true underglaze body | 72 colors | $5 to $7 | Wide cone range, professional studio work |
If you want one recommendation to start with, Amaco Velvet is the most widely used underglaze in North American studio pottery. It is genuinely opaque in three coats, holds color cleanly across the full cone range, and has a palette covering every primary plus useful neutrals. Most studios stock at least the basic Velvet set.
Mayco Stroke & Coat is worth mentioning separately because it is not strictly an underglaze – it is a hybrid that fires glossy on its own without a clear coat. It is the most beginner-friendly option for one-step decorating, though purists argue it sacrifices some color sharpness for that versatility.
If you eventually want to mix your own colors from raw materials, Ceramic Arts Network’s guide to homemade underglazes covers the formulation chemistry, suggested base recipes, and the colorant percentages that produce consistent results.
Layering and Color Mixing
Once you have the basics down, layering and mixing is where underglaze gets genuinely exciting. The same colors that look flat when used alone come alive when you stack them or feather them together.
For depth and gradient effects, apply your darker color first and let it dry completely. Then sponge or dry-brush a lighter color on top, letting the dark layer show through in places. The result is a multidimensional surface that brushwork alone cannot achieve. This technique works especially well for landscapes, animal coats, and stone or wood textures.
For mixing colors, you have two distinct options with different outcomes. Mixing in the jar (or on a palette) produces a new uniform color – useful when you need a precise hue you cannot buy off the shelf. Use a separate clean container rather than mixing directly in your manufacturer’s jar; cross-contamination ruins both colors permanently. Mixing on the piece, where you brush a wet color into another wet color, produces feathered transitions and watercolor-like blending. Both are valid, and most decorators use both within the same piece.
Sharp graphic lines call for fully dried first layers, painters tape or wax resist for masking, and a steady hand with a liner brush. Painterly washes call for thinned underglaze (mix with about 20 to 30 percent water) and softer brushes that hold a lot of liquid. The same color can look like graphic ink or like watercolor depending entirely on how you mix and apply it.
Storage is easy to neglect. Keep lids tight, store at room temperature out of direct sun, and stir before each use because pigments settle. If a jar dries out, add distilled water a teaspoon at a time, stir, and let it sit covered for 24 hours. Repeat until brushable. A teaspoon of glycerin per ounce helps if your underglaze keeps drying on the brush.
8 Beginner Mistakes with Underglaze (and How to Avoid Them)
Almost every potter makes these mistakes at least once. Here is how to skip past them.
1. Applying too thick
Thick blobs of underglaze crawl, crack, and pull away from the clay during firing. The fix: three thin coats, each fully dry before the next, not one heavy coat. If you can see brush ridges after a coat dries, you went too heavy.
2. Skipping coats
One or two coats fires lighter than expected and shows streaks. Three coats at right angles to each other is the minimum for even, opaque coverage. If you want extra intensity, four coats is fine. One coat is almost never enough.
3. Applying to wet greenware without adjusting formula
Standard underglaze is formulated for bisqueware. Painting it on very wet greenware can cause the underglaze to slough off, crack, or warp the piece. If you are decorating green, work at the leather-hard stage and consider adding a little ball clay to the underglaze to improve adhesion.
4. Mixing colors directly in the jar
Stick a brush loaded with red into your blue jar and you have contaminated both jars permanently. Always pour what you need onto a tile or palette and mix there. Use clean water and clean brushes between colors.
5. Firing without a clear glaze
Underglaze fired without a clear top coat looks matte and chalky, not the bright finish you see in magazines. This is correct behavior, not a defect. To get the gloss, apply a clear glaze and fire again. Some potters deliberately leave underglaze unglazed for a matte aesthetic, but it is a choice, not the default.
6. Using underglaze at the wrong cone
Firing a low-fire bright red at cone 10 burns the color out. Firing a cone 10 stable color at cone 06 may leave it underdeveloped and chalky. Check the cone rating on every bottle and respect it.
7. Not testing new colors on test tiles
What looks like “burgundy” in the jar may fire as muddy brown in your kiln. Always fire a test tile of any new color, on the clay body you actually use, at the cone you actually fire, before painting it on real work. Photograph and label your test tiles.
8. Storing with the lid off
Underglaze dries out fast when exposed to air. A jar left open during a long decorating session can be partially dried within an hour. Keep the lid on between brush loads, and seal it tight when you are done. A wide rubber band around the rim helps if the lid threads are stained and no longer seal cleanly.
Frequently Asked Questions
What is the difference between underglaze and glaze?
Underglaze is applied beneath a transparent glaze and fires to a matte or satin surface if left uncoated. Regular glaze melts to form a glassy surface and runs more during firing. Underglazes give precise, stable color; glazes give surface texture and sheen.
Can you use underglaze without a clear glaze on top?
Yes, but the fired underglaze will have a matte, chalky appearance rather than a gloss finish. Many potters leave functional pieces unglazed on exterior decorations deliberately. For food-contact surfaces, always apply a food-safe clear glaze on top.
Do you apply underglaze before or after bisque firing?
Both work. Applying to bisqueware is easiest for beginners because the porous surface absorbs the underglaze evenly. Applying to leather-hard greenware lets you use carving techniques like mishima and sgraffito.
Can underglaze be used on air-dry clay?
No. Air-dry clay does not get fired in a kiln, and underglaze requires kiln firing to permanently bond to the clay surface. Acrylic craft paints are the correct decorating medium for air-dry clay projects.
Why does my underglaze look dull after firing?
If you fired without a clear glaze on top, the underglaze surface will appear matte. Apply a coat of transparent glaze over the fired piece and re-fire to create gloss. Also check that you applied at least 3 coats of underglaze – thin coverage fires lighter than expected.
Is underglaze food safe?
Commercial lead-free underglazes from reputable brands (Amaco, Speedball, Mayco) are non-toxic and food safe when covered with a food-safe clear glaze. The underglaze layer itself is sealed by the clear glaze during firing. Always verify that both your underglaze and your clear glaze are rated food safe before making functional ware.