
Ceramic glaze is a glass-forming coating that fuses to pottery in the kiln, making your work waterproof, food-safe, and colorful. The single most important thing a beginner needs to know before buying any glaze: match the glaze’s cone range to your clay body’s cone range. Everything else is learnable as you go.
Glazing is where pottery turns from a clay object into a finished piece you can drink from, eat off, or display. It is also where new potters lose the most work, usually for reasons that have nothing to do with artistic skill. This guide walks you through what glaze actually is, the cone-matching rule that prevents 80% of beginner disasters, which commercial glazes to buy first, the three ways to apply them, and the five mistakes worth avoiding.
What Is Ceramic Glaze (and What Does It Actually Do)?
Ceramic glaze is, at its core, a glass formula. It is made from three families of ingredients: silica (the glass former), alumina (which gives the glass body and keeps it from running off the pot), and flux minerals (which lower the melting point so the mixture can fuse at kiln temperatures rather than at the much higher temperatures pure silica would need). These are mixed with water, applied to bisque-fired pottery, and then re-fired. The powder melts, the chemistry rearranges, and you get a thin sheet of glass bonded to the clay.
Glaze does three jobs at once. It seals the clay body so functional ware holds water without seeping. It adds color and surface texture, from glossy bright primaries to soft mattes to dramatic crystalline effects. And, when formulated and fired correctly, it produces a food-safe surface that does not leach into what you eat or drink.
A quick vocabulary distinction that confuses every new potter: underglaze goes on before the glaze layer, usually as color decoration painted onto greenware or bisque. Glaze is the transparent or opaque fired-glass layer that does the sealing. Overglaze or luster goes on after the first glaze firing, at lower temperatures, for metallic or decorative effects. Most beginners start with one of two combinations: underglaze plus a clear glaze on top, or a single colored opaque glaze that does everything in one pass.
If you want a deeper read on the chemistry, Glazy has an excellent primer covering glaze chemistry basics including the role of silica, alumina, and flux. You do not need to understand any of it to start glazing. You just need to match cones.
The One Thing Beginners Always Get Wrong: Cone Compatibility
If you only remember one section of this guide, make it this one. The most common cause of a ruined first glazing session is not bad brushwork or thin application. It is buying a beautiful glaze that was never designed to fire in your kiln.
A “cone” in pottery is a measurement of heat work, not raw temperature. Heat work is the combination of how hot the kiln gets and how long it stays there. The pyrometric cone system, originally based on small ceramic cones that bend at specific heat-work thresholds, gives every clay and glaze a target firing range. Lower cone numbers (preceded by a zero, like 06 or 04) are cooler. Higher numbers (5, 6, 10) are hotter.
Here is what those ranges mean in practice:
| Cone Range | Firing Temp (approx) | Typical Clay Bodies | Common Glaze Line | What Happens if Mismatched |
|---|---|---|---|---|
| Low-fire (06-04) | ~1000-1060°C / 1832-1940°F | Earthenware, red terracotta | AMACO LG, Mayco S&C at low | Underfired glaze looks matte and can be porous |
| Mid-fire (5-6) | ~1196-1222°C / 2185-2232°F | Stoneware (most studio clay) | AMACO Velvet plus clear, Mayco S&C | Correct range for most beginners with school or studio kilns |
| High-fire (9-10) | ~1280-1305°C / 2336-2381°F | Reduction stoneware, porcelain | Specialty high-fire lines | A low-fire glaze will run off the pot or burn away entirely |
The classic beginner mistake looks like this: a new potter falls in love with a low-fire glaze color at the supply store, brings it home, and brushes it onto stoneware that will be fired to cone 6. The glaze never reaches its melting point properly. The finish comes out chalky, the color shifts to something muddy, and the surface stays porous and unsafe for food. The reverse mistake, putting a high-fire glaze on low-fire clay, is worse: the clay melts before the glaze even matures.
Before you buy any glaze, find out what cone your kiln fires to. It is usually printed on the kiln controller or listed in the kiln manual. If you are working in a class or a community studio, ask the technician. Then check that against your clay body’s cone compatibility, because the clay and the glaze both have to agree on the same firing range. For an overview of the firing ranges different clays expect, our guide to different clay types and their firing ranges covers earthenware, stoneware, and porcelain side by side.
Best Commercial Glazes for Beginners
We suggest starting with commercial glazes rather than mixing your own from raw materials. Commercial glazes have already been tested for consistency, food safety, and predictable fired color. Mixing your own glazes is a satisfying skill, but it belongs to your second year of pottery, not your first month.
Here are three glaze lines that consistently work well for new potters:
| Glaze | Brand | Cone Range | Application Methods | Beginner Ease | Best For |
|---|---|---|---|---|---|
| Velvet Underglazes (V Series) | AMACO | Cone 05/06 to Cone 6 | Brush, sponge | Very Easy | Color decoration under a clear glaze with consistent fired color |
| Stroke & Coat | Mayco | Cone 06 to Cone 10 | Brush, dip | Very Easy | All-in-one glaze and color; works at nearly every cone |
| LG Gloss Glazes | AMACO | Cone 06 | Brush, dip | Easy | Bright colors at low-fire; good for classroom kilns |
AMACO Velvet Underglazes. The most beginner-friendly introduction to pottery color we know of. You apply them to bisqueware (or even to bone-dry greenware) much like watercolor or acrylic paint, then cover the piece with a clear glaze before firing. Color fires true from cone 06 all the way up to cone 6, which means the same jar of color works in a classroom kiln or a studio stoneware kiln. They are sold in 2 oz jars, so a starter set of six colors is inexpensive. AMACO Velvet Underglazes are the easiest way to add controlled illustration to your work.
Mayco Stroke & Coat. Ceramics teachers nicknamed this one “the wonder glaze” for a reason. It fires to a glossy finish without needing a separate clear coat, it works from cone 06 all the way through cone 10, and the colors hold true across that entire range. If you do not yet know what cone your kiln fires to, Mayco Stroke & Coat offers the widest margin for error of any commercial glaze on the market.
AMACO LG Series. A straightforward set of glossy commercial glazes designed specifically for low-fire earthenware at cone 06. Bright, saturated, and forgiving. A solid pick if your studio or class fires a small electric kiln to cone 06 and you want vivid colors without thinking about it.
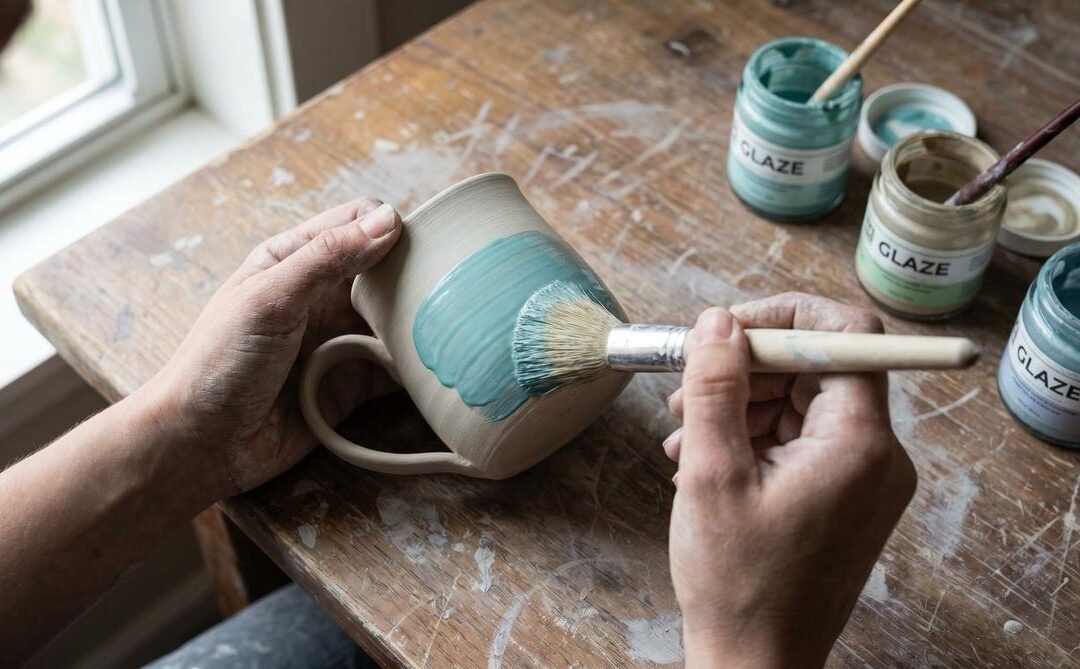
The Three Ways to Apply Glaze
There are three application methods every beginner should know. Each has its own strengths.
| Method | How It Works | Best For | Skill Level | What You Need |
|---|---|---|---|---|
| Brushing | Apply 3+ coats by brush, changing direction each coat | Small batches, detail work, layering colors | Beginner | Soft hake brush, glaze, two rinse bowls |
| Dipping | Submerge the piece in a glaze bucket for 3-5 seconds | Consistent full coverage, production runs | Intermediate | Large bucket, tongs, wax resist |
| Pouring | Pour glaze into and out of the piece | Coating interiors of mugs and bowls | Beginner | Pitcher or ladle, catch basin |
Brushing. The most accessible method and the one most home potters will use. Load your brush fully, do not scrimp, and apply at least 3 full coats. Change direction with each coat: horizontal first, then diagonal, then vertical. This evens out coverage and eliminates the streaks that come from brushing every coat in the same direction. Let each coat dry completely before applying the next, because wet glaze over wet glaze will lift the bottom coat back onto your brush.
Dipping. Fast and produces remarkably even coverage, but you need enough glaze to fully submerge the piece. Wax the foot ring before dipping so glaze does not stick to the kiln shelf during firing. Submerge for 3-5 seconds, then lift and set the piece aside to dry. For pieces too large for any bucket you own, combine dipping the bottom half with pouring on the top.
Pouring. Pour glaze inside a mug or bowl, swirl it around to coat the interior, then pour the excess back into the bucket. For the outside, hold the piece over a catch basin and pour glaze over it while rotating slowly. Pouring is less even than dipping but more economical when you have a limited amount of glaze. It is also the go-to method for coating interiors of tall vessels you cannot easily reach with a brush.
If you want a more granular reference on brushwork, PotteryCrafters has in-depth brushing tips including brush types and coat thickness that complement what we cover here.
Five Mistakes That Ruin First Glazing Sessions
Almost every first-batch problem traces back to one of these five errors.
1. Not waxing the foot ring. Glaze is glass. In the kiln it fuses to whatever it touches, including the kiln shelf. Every piece needs a clean, glaze-free foot ring or contact zone. Use wax resist on the bottom before applying glaze, or clean any stray glaze off carefully with a damp sponge before loading the kiln. Forget this once and you will spend an evening with a chisel separating your mug from a shelf.
2. Applying glaze too thin. The single biggest source of streaky, uneven, washed-out results. Your brush should be loaded, not dry. Three full coats, not three light wipes. If you can still see the bisque color through the wet glaze after a coat, your coat is too thin.
3. Not letting coats dry between layers. Wet glaze applied over wet glaze drags the bottom coat back up onto your brush, producing uneven thickness and bald patches. Wait until the previous coat is no longer cold to the touch (cold means it is still evaporating water) before applying the next.
4. Using the wrong cone glaze. We covered this in detail earlier, but it bears repeating. A low-fire glaze fired to cone 6 will look wrong, may crawl off the surface, and can leave a porous, unsafe-for-food finish. Always check cone compatibility before opening the jar. Our overview of matching glaze cone to your clay body goes into more depth on this pairing.
5. Handling bisqueware with bare hands, especially after applying lotion. Oils from your skin (and any hand cream you used that morning) repel glaze. Glaze will crawl away from oily fingerprints in the kiln, leaving bare patches in the exact shape of your thumb. Use cotton gloves, or wash your hands with plain soap right before handling bisqueware for glazing.
What You Need to Set Up for Glazing
Your starter kit is short. Soft hake-style brushes (they hold far more glaze than a standard bristle brush, which matters when you are loading three full coats). Tongs for dipping. Wax resist for foot rings. A clean damp sponge for wiping foot rings clean after glazing. A plastic bucket large enough for dipping if you plan to dip. A small kitchen scale if you ever mix commercial glazes from powder.
One safety point worth making explicitly: dry glaze powder and dry glaze dust contain crystalline silica, which is harmful to breathe in over time. When you are handling dry glaze, pouring from a bag, or sanding a rough glaze surface, wear an N95 respirator or better. Once the glaze is mixed with water, the airborne risk is low. Once it is fired into glass on your pot, it is inert and safe.
For a wider tools setup, see our list of the full beginner tools list including glazing essentials. If you are still upstream of the glazing stage, our guide on bisque firing your pottery before glazing covers the firing that has to happen first. And for a broader look at the process as a whole, we have a separate piece on more on what the glazing process involves from start to finish.
Frequently Asked Questions
Do I need to bisque fire before glazing?
For most commercial glazes, yes. Bisque-fired pottery is porous enough for the glaze layer to grip the surface properly and dry evenly. You can single-fire (apply glaze directly to raw clay and fire once), but it requires more skill and a glaze formulation suited to that process. Beginners should bisque fire first.
What glaze should a complete beginner buy?
We suggest starting with Mayco Stroke & Coat for simplicity. It works across cone 06 to cone 10, fires to a glossy finish without a separate clear coat, and the colors are reliable across the range. If you want to do illustrated decoration, pair AMACO Velvet Underglazes with a clear overglaze instead.
How many coats of glaze do I need?
Usually 3 coats for full, opaque coverage when brushing. Some thinner commercial glazes need 4. Applying too thin is the most common beginner mistake and causes streaking and an uneven fired finish.
Can I mix different brands of glaze together?
Only if they share the same cone range. Mixing a cone 06 glaze with a cone 6 glaze creates unpredictable, often ugly results. Within the same cone range, and ideally the same manufacturer, layering can produce interesting effects, but test on tiles before committing to a finished piece.
Why did my glaze come out streaky after firing?
Almost always because the coats were applied too thin or because the brush was not loaded fully. You can refire with a thicker application if the piece can take another firing, or treat it as a test tile and refine your technique on the next batch.
Is food-safe glaze actually safe for mugs and bowls?
Commercial glazes labeled “AP Non-Toxic” and “Dinnerware Safe” (Mayco Stroke & Coat among them) are safe when fired to the correct cone. The key phrase is “when fired correctly,” because underfired glaze can leach trace materials. Always fire to the manufacturer’s specified cone.