
Hand Building Pottery: A Complete Guide to All Three Techniques
Hand building pottery is the practice of forming clay vessels without a wheel, using three core methods: pinch pots, coil building, and slab building. It’s the oldest pottery-making method on Earth, dating back tens of thousands of years, and requires almost no specialized equipment. For beginners, hand building is the ideal starting point because it teaches you how clay behaves before you add the complexity of a spinning wheel.

If you’ve ever pressed your thumb into a lump of damp clay and watched a small bowl appear, you’ve already done hand building pottery. That same instinctive movement, scaled up and refined, is how humans have made pots for at least 20,000 years. There’s a reason hand building keeps drawing new potters in: it asks nothing of you except your hands, a little clay, and a willingness to feel your way through.
This guide walks through all three hand building pottery techniques as a progression. We’ll start with pinch pots (where every potter should begin), move into coil building (where you learn to construct real height and structure), and finish with slab building (where geometry and architecture enter the picture). By the end, you’ll know which technique fits the piece you want to make, what tools you actually need, and how to avoid the cracks that frustrate most beginners.
What Is Hand Building Pottery?
Hand building pottery is any method of forming clay into a finished shape without using a potter’s wheel. The three primary hand building pottery techniques are pinch pot pottery, coil pottery, and slab building pottery. Each uses a different starting form: a ball, a rope, or a flat sheet, and each suits different kinds of objects.
Hand building clay work predates the potter’s wheel by thousands of years. The earliest known fired ceramics, the Venus figurines of Dolní Věstonice, are roughly 26,000 years old, and they were all hand built. Wheel throwing didn’t appear until around 3500 BCE in Mesopotamia. If you want to read more about that long arc of ceramic history, our deep dive on why pottery matters in human history covers it in detail.
What makes hand building so durable as a practice is its honesty. The clay shows the marks of your fingers, and those marks are the point, not a flaw to hide. A hand-built mug looks like a hand-built mug, and that’s part of why people make them and why other people want to buy them.
Hand Building vs. Wheel Throwing: Which Should You Try First?
Here’s the honest answer most potters wish they’d heard sooner: hand building is more forgiving, requires less equipment, and teaches you the fundamentals of clay behavior faster than wheel throwing does. Wheel throwing is a beautiful skill, but it adds a second variable (rotation and centrifugal force) on top of the first variable (clay itself). Most beginners struggle on the wheel for months before producing anything they’d keep.
Hand building produces organic, irregular forms with character. Wheel throwing produces symmetrical, repeatable forms. Neither is better. They’re different tools for different goals. If you want to make twelve matching dinner plates, the wheel is the right answer eventually. If you want to make one weird, beautiful planter that looks like nothing else on the shelf, hand building gets you there on day one.
We suggest hand building as the starting point for almost every beginner. You’ll learn how clay responds to pressure, how moisture affects workability, how joints fail, and how drying causes cracks, all without fighting a spinning surface at the same time. Once you understand the material, moving to a pottery wheel later is much easier. Skipping hand building to go straight to wheel work is like learning to drive on a manual transmission before you’ve learned to steer.
The Pinch Pot Technique: Where Every Potter Starts
Pinch pot pottery is the simplest of the three hand building techniques, and it’s also the most direct: a ball of clay, your fingers, and patience. The pinch pot is how potters have started for thousands of years, and how children all over the world still start today. There’s a reason for that. The technique teaches you, in about ten minutes, how clay yields to pressure and how thin you can make a wall before it tears.
Step-by-Step: How to Make a Pinch Pot
- Start with a ball of clay roughly the size of a tennis ball. Wedge it briefly to remove air pockets. The clay should feel firm but pliable, not sticky.
- Cradle the ball in your non-dominant hand. Press your dominant thumb straight down into the center, stopping when you’re about half an inch from the bottom. You can check the thickness by gently squeezing the base between thumb and finger.
- Begin pinching the walls. With your thumb on the inside and fingers on the outside, squeeze gently and rotate the clay a quarter turn. Squeeze, rotate, squeeze, rotate. Move slowly and stay near the base for the first pass.
- Work upward in spirals. Once the base wall has thinned to roughly a quarter inch, start moving your pinches upward. Each rotation should travel slightly higher than the last, building height and thinning the walls evenly.
- Watch for cracks at the rim. If the rim starts cracking, the clay is drying out. Dampen your fingertips with a sponge and smooth the cracks before continuing.
- Refine the shape. Once the form is roughly right, use a needle tool to trim the rim flat, then smooth it with a damp finger. Set the pot on a flat surface and check that it sits level.
- Let it firm up before adding details. If you want handles, feet, or surface texture, wait until the pot reaches a leather-hard state (firm but still cool to the touch).
Best First Projects for Pinch Pottery
Pick a project that matches what pinch pots do well: small, organic, hand-sized forms. Here are four good starting points:
- Small bowls (3-4 inches across). The classic pinch pot project. Use them for jewelry, salt, olive pits, or kitchen prep. Two evenings will give you a usable bowl.
- Pinch pot animals. Make two pinch pots, join them rim to rim into a hollow sphere, then add legs, ears, and a face. This is how potters have made figurines for millennia and it teaches you joining technique in a low-stakes way.
- Espresso cups. Smaller than a coffee mug, the proportions forgive uneven walls. A pinch-formed espresso cup with a small applied handle is a satisfying first functional piece.
- Incense holders. A shallow pinch pot with a single hole pressed in the center holds a stick of incense. Quick to make, immediately useful, and a great gift.
Tools for Pinch Pottery (Very Few Required)
One of pinch pot pottery’s deepest appeals is how little gear it asks for. You can make a real pot with:
- Clay. A small bag (5-10 lbs) is plenty to start. Look at our pottery clay selection for beginner-friendly options.
- A work surface. A wooden board, a piece of canvas, or even a clean kitchen counter works.
- A small sponge. For keeping your fingers and the rim damp.
- A needle tool. For trimming the rim and scoring joints. A toothpick works in a pinch.
That’s the whole list. No wheel, no slab roller, no expensive setup. If you want to expand later, our pottery tools guide covers the next purchases worth making.

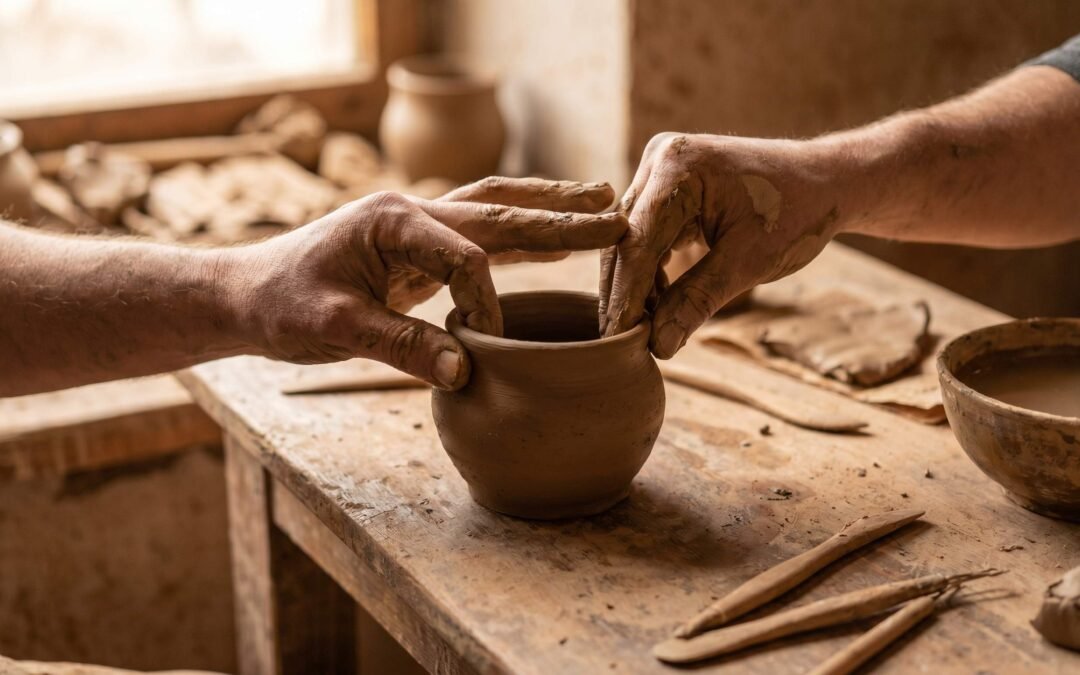
The Coil Building Technique: Building Structure from Rope
Once you’ve made a few pinch pots and you understand how clay behaves under your fingers, coil pottery is the natural next step. Coil building unlocks height. Pinch pots top out around four or five inches before the walls get too thin to support themselves. Coiling lets you build vessels two feet tall.
The technique is ancient and global. Indigenous potters in the American Southwest, in West Africa, in Korea, in the Andes all developed sophisticated coil-building traditions long before any of them had wheels. A well-built coil pot is structurally sound, often more sound than a thrown pot, because each coil is essentially a reinforcing ring.
How to Build with Clay Coils: Step-by-Step
- Make a base. Start with a small flat slab or a flattened ball of clay. Cut it to the shape you want your pot’s bottom to be. This is your foundation.
- Roll your first coil. Take a fist-sized lump of clay, press it into a rough rope, and roll it back and forth on your work surface with flat palms. Work from the middle outward to keep the diameter even. Aim for roughly half an inch thick, the diameter of a pencil if you want thin walls, the diameter of a thumb if you want sturdy walls.
- Score and slip the base edge. Use a needle tool to scratch crosshatches around the top edge of your base, then brush on slip (clay watered down to the consistency of yogurt).
- Lay the first coil. Press it firmly onto the scored, slipped edge of the base. Trim where the ends meet so they butt together cleanly.
- Blend the interior joint. This is the critical step. Use your finger or a rib tool to drag clay downward from the coil into the base, fully merging them on the inside. The exterior can stay textured if you want a visible coil pattern, or you can blend it smooth.
- Repeat with each new coil. Score, slip, place, blend. Each new coil should be at the same moisture level as the one below it, neither wetter nor drier.
- Check the wall as you build. Every few coils, step back and look. If the wall is leaning, gently push it back into shape while the clay is still soft.
- Slow down near the top. The lower coils are now supporting weight, and if they’re not firm enough, the whole pot will sag. If the base feels soft, stop, cover the pot loosely with plastic, and come back in a few hours.
Sealing Coil Joints: Why This Step Can’t Be Rushed
The single most common reason coil pots crack during drying or firing is unblended joints. When two coils sit on top of each other without being properly merged, they look attached but they’re not actually one piece of clay. As the pot dries and shrinks, the seam pulls apart.
The solution is the score-and-slip method, done thoroughly. Score means scratching crosshatches into both surfaces that will meet. Slip means brushing on a thin layer of slurry that acts as the bonding agent. Then you press the surfaces together and, critically, blend the interior. The Ceramic Arts Network has good reference material on clay body behavior if you want to understand the science.
Three rules to follow:
- Score deep enough to feel rough, not just marked. The crosshatches should give the slip something to grip.
- Blend interior joints completely. The exterior can stay decorative, but the interior must be one continuous, smooth surface. If you can still see where one coil ends and the next begins on the inside, blend more.
- Match moisture levels. Adding a fresh, wet coil to a dry base creates a stress line. Cover work in progress with plastic between sessions so everything stays at the same moisture.
Get the joints right and your coil pots will survive firing reliably. Skip this step and you’ll learn an expensive lesson when half your batch comes out of the kiln with cracks running through them.
Best Projects for Coil Building
Coil building’s strength is height and organic shape. Projects that suit it well include:
- Tall vases. Twelve to twenty-four inches of height is achievable. Cylindrical, bottle-shaped, or amphora forms all work.
- Large bowls. Anything bigger than your hand can pinch comfortably is a job for coils. Mixing bowls, serving bowls, and even small basins all coil-build well.
- Sculptural forms. Faces, abstract figures, asymmetric vessels. The coil method lets you change wall direction mid-build in ways the wheel never could.
- Vessels with irregular shapes. Anything where symmetry would feel wrong. Coil building is for the piece that has a back and a front.
The Slab Building Technique: Geometric Forms and Architectural Shapes
Slab building pottery is the most architectural of the three techniques. Where pinch pots are organic and coil pots are organic with structure, slab pots are constructed: they have planes, edges, and corners. If you want to make a rectangular planter, a square serving plate, or a mug with a flat back, slab building is the technique.
How to Roll and Cut Slabs
The goal is a flat sheet of clay at consistent thickness. There are two ways to do this:
- Rolling pin and guide sticks. Place two wooden sticks of equal thickness (1/4 inch is standard for most projects) on either side of your clay. Roll the pin across them. The sticks force the rolling pin to stop at exactly the thickness you want.
- Slab roller. A studio tool that produces large, perfectly even slabs in seconds. Worth the cost only if you make a lot of slab work.
Always roll on a piece of canvas. The texture prevents sticking and gives your slab a subtle surface pattern. Flip the clay over halfway through rolling so both sides get the canvas texture. Once rolled, use templates (paper or cardboard cutouts of the shapes you want) and a needle tool to cut your pieces. Cut firmly and in one motion to keep edges clean.
For most beginner projects, 1/4 inch is the right thickness. Thinner slabs are harder to handle without distorting. Thicker slabs take longer to dry evenly and waste clay.
Joining Slabs: Score, Slip, and Press
Slab joining uses the same score-and-slip method as coil joining, but with one critical timing detail: slabs need to be at the leather-hard stage before you join them.
Leather hard means the clay is firm enough to hold its shape but still cool and damp to the touch. If you press your fingernail into leather-hard clay, you leave a clean indent without the clay sticking to your nail. Too wet, and your slabs will sag and warp the moment you try to stand them up. Too dry, and the joints won’t bond properly and will crack at the seams.
To get slabs to leather hard, roll them out, then let them sit (covered loosely with plastic or canvas) for 30 minutes to a few hours, depending on humidity. Check by touch. When they feel firm but still cool, they’re ready.
To join:
- Score both edges that will meet, deeply enough to feel the texture.
- Apply slip generously to both scored surfaces.
- Press the edges together firmly and hold for a few seconds.
- Reinforce the interior seam with a thin coil of clay, pressed and blended into the joint to add structural strength.
- Clean the exterior seam with a rib tool or damp sponge, leaving as crisp an edge as you want.
Best Projects for Slab Building
Slab building is for geometry. Strong project ideas include:
- Mugs. Wrap a rectangular slab into a cylinder, attach a circular slab base, add a pulled or slab-built handle. Slab mugs have a distinct, contemporary look.
- Plates. Cut a circle from a rolled slab, gently drape it over a curved form to give it a slight dish, and let it dry on the mold.
- Square or rectangular vases. Four flat walls and a base, joined at the seams. Crisp, modern, well-suited to single-stem flowers.
- Wall tiles. Cut squares or hexagons from a slab, decorate the surface, fire, and mount. A natural entry point into ceramic art on the wall.
- Slab-built boxes with lids. Five slabs (four sides and a base) form the box, plus a separately built lid. An advanced slab project that demands precision but produces gift-quality work.
Hand Building Techniques Comparison
| Technique | Skill Level | Best For | Main Tools | Typical Projects | Common Challenges |
|---|---|---|---|---|---|
| Pinch Pot | Beginner | Small, organic, hand-held forms | Clay, sponge, needle tool | Bowls, cups, incense holders, animals | Uneven wall thickness, rim cracking |
| Coil Building | Beginner to Intermediate | Tall vessels, organic large forms | Clay, slip, scoring tool, rib | Vases, large bowls, sculpture | Joint cracking, walls leaning, uneven coil thickness |
| Slab Building | Beginner to Advanced | Geometric and architectural forms | Rolling pin, guide sticks, canvas, templates | Mugs, plates, square vases, tiles, boxes | Warping during drying, weak seams, slab too wet or too dry |

Clay Types for Hand Building
The clay you choose matters more than most beginners realize. Hand building clay needs to hold its shape under pressure, accept joints cleanly, and dry without warping. Not every clay body does that well.
Best Clay for Beginners
For most new hand builders, earthenware is the right starting point. It’s affordable, widely available, fires at lower (cheaper, more accessible) temperatures, and is forgiving when you make mistakes. Most community studios stock it.
Within earthenware, look for a grogged clay body. Grog is fired clay that’s been crushed and added back into the mix. It gives the clay tooth (texture) and structural integrity, which makes it dramatically easier to hand build with. Smooth, ungrogged clays are designed for wheel throwing and can collapse under coil weight or warp during slab work. If the label says “for hand building” or “grogged,” you’re in the right zone. Generic studio earthenware with some grog content runs $20-30 for a 25-pound bag, which is enough clay for ten or fifteen first projects.
Stoneware vs. Earthenware for Hand Building
The two main clay families you’ll encounter are earthenware and stoneware. They behave differently and fire at very different temperatures.
Earthenware fires at low temperatures (cone 06 to cone 04, roughly 1830-1945°F). It stays porous after firing, meaning unglazed earthenware will absorb water. It’s typically terracotta red or buff in color. It’s the clay of historic flowerpots, Mexican folk pottery, and most kindergarten ceramics projects. For a beginner, it has one huge advantage: if a piece fails, you’ve wasted cheap clay and used a less expensive firing.
Stoneware fires at higher temperatures (cone 6 to cone 10, roughly 2230-2380°F). At these temperatures the clay vitrifies, meaning the particles fuse into a glass-like, non-porous body. Stoneware is more durable, dishwasher safe, microwave safe when properly glazed, and is what most functional studio pottery is made from today. The downside for a beginner: it’s pickier to work with, more expensive, and requires access to a higher-firing kiln. Organizations like the National Council on Education for the Ceramic Arts have community resources that can help you find local studios with the right kilns.
Start on earthenware. Once you’ve made fifteen or twenty pieces, then think about moving to stoneware.
Drying and Firing Your Hand-Built Pottery
You’ve made the pot. The hard part, surprisingly, is what comes next. More beginner work is destroyed by bad drying than by bad building.
Drying Slowly: The Most Ignored Step
Clay shrinks as it dries. If a piece dries unevenly (one side faster than the other, or thin sections faster than thick ones), the differential shrinkage creates stress, and stress creates cracks.
The fix is simple and slow: dry your work covered, gradually. After finishing a piece, drape it loosely with a plastic bag for the first 24-48 hours. This slows the moisture loss to a crawl and lets the entire piece reach an equilibrium moisture level. After that initial covered period, gradually open up the plastic over several days. Move the piece out into open air only after it’s reached leather-hard and feels evenly firm everywhere.
Pay special attention to areas where clay thickness changes: where a handle joins a mug, where a foot meets a base, where a coil seam runs along a wall. Those transitions dry at different rates than the surrounding clay, and that’s where cracks appear. If a piece has handles or thick attachments, wrap a strip of plastic specifically around those areas for the first day.
For a tall coil-built vase, a full week of slow drying is not excessive. Patience here saves the piece.
Firing Options for Hand Builders
Once your pot is bone dry (uniformly room temperature to the touch, no cold spots), it’s ready for firing. You have three main paths:
- Community studio kiln access. Many cities have community ceramic studios that offer firing services and memberships. Bring your bone-dry piece, pay a per-piece or per-pound fee, and pick it up a week later. This is the most common route for hobbyist hand builders.
- Home electric kiln. A small tabletop kiln runs $1,000-2,000 and can fit on a workbench. Worth it once you’re making pottery regularly and want full control. Requires a dedicated electrical circuit and proper ventilation.
- Air-dry clay (no firing). A separate category of clay that hardens at room temperature without a kiln. Useful for decorative pieces, sculpture, and learning the techniques, but air-dry pieces are not waterproof and not food safe. Don’t make plates or mugs from air-dry clay.
The full firing cycle for real ceramic clay has two stages. First, a bisque firing (cone 06-04 for most clays) hardens the piece and burns out organic material. Then you glaze the bisqued pot and run a glaze firing at the clay body’s appropriate temperature. Stoneware glaze firings run at cone 6-10. Each firing takes 8-12 hours of kiln time plus another 12-24 hours to cool down. If you’re using a community kiln, plan on two weeks turnaround from finished pot to glazed, finished work in your hands. Organizations like the American Craft Council maintain directories of community studios that can help you find local firing options.
Frequently Asked Questions About Hand Building Pottery
Can you hand build pottery at home without a kiln?
Yes, with two paths. The first is to use air-dry clay, which hardens at room temperature but isn’t waterproof or food safe (good for sculpture and decorative pieces, not functional ware). The second is to hand build with real ceramic clay at home and then take your bone-dry pieces to a community studio or a paid firing service for the kiln work. Most hobbyist potters use this second approach for years before investing in their own kiln.
What type of clay is best for hand building?
A grogged earthenware is the best clay for hand building beginners. The grog (added fired-clay particles) gives the clay tooth and structural integrity, making it easier to coil and slab build without sagging. Earthenware fires at lower temperatures, costs less, and is widely available at art supply stores and ceramic suppliers. Look for bags labeled “hand building” or “grogged” to identify suitable options.
How long does hand-built pottery take to dry before firing?
Most hand-built pottery needs three to seven days of slow drying before it’s ready for the kiln. Small, thin-walled pieces dry in a few days. Tall coil-built vases or thick slab-built sculptures can take a week or more. The piece must be uniformly bone dry, meaning it feels room-temperature everywhere, before firing. Cold spots indicate trapped moisture, and moisture in a kiln will cause the piece to explode.
Is hand building easier than wheel throwing?
Yes, hand building has a much gentler learning curve than wheel throwing. You can make a usable pinch pot in your first session, while throwing a centered cylinder on the wheel typically takes weeks of practice. Hand building also requires far less equipment. That said, wheel throwing produces symmetrical, repeatable forms that hand building can’t easily match. Most potters do both.
What tools do I need to start hand building pottery?
You need very little to start. A bag of clay, a sponge, a needle tool (or substitute like a toothpick), and a flat work surface will get you through pinch pot work. For coil building, add a rib tool for blending joints. For slab building, add a rolling pin, two guide sticks (1/4 inch thick), a piece of canvas, and templates for cutting shapes. Total cost for a beginner setup runs $30-50.
Can you make functional pottery with hand building techniques?
Yes. Hand-built pottery can be fully functional, food safe, and dishwasher safe when made with stoneware clay, properly fired, and glazed with food-safe glazes. Many professional potters work exclusively in hand building methods, producing mugs, plates, bowls, vases, and serving ware that performs just as well as wheel-thrown equivalents. The look is different (more organic and irregular) but the function is the same.